cutting, stamping and tying

    how to make gift labels- cityhippyfarmgirl making labels- cityhippyfarmgirlhow to make labels- cityhippyfarmgirl

It’s dark outside

and everyone is asleep,

except for one

One who is cutting, stamping and tying,

now what do I need again?

brown paper for jam jar tops

brown cardboard

twine

hole punch

scissors I’ve had for 26 years

new stamps to play with from here

recycled glass jars

and the afternoon before of a hot sticky kitchen, making jam

gifts ready to go

and a bed that is calling

************

What are you making at the moment?

* linking into the inspiring My Creative Space

everyday rolls

rolls

If you are a regular reader of this blog, you might have noticed I bake a little bread… ok, rather a lot of bread.

Bread making doesn’t have to be a chore. Once you get the hang of it, it can just become a part of your weekly routine. I make bread about twice a week these days, the kind of dough always varying depending on my time, tastes and what I might have on hand to chuck into the dough.

These everyday kind of rolls frequently pop up though. They are quick to make, always reliable, and easy to throw into the freezer to be retrieved later for school or work lunches.

Making your own bread keeps costs down and you get to decide what goes into it. No paragraph of “stuff” in my bread please.

For an easy ‘how to’ post, see here (how to make bread for the person who thinks they can’t, but really they can.)

Now this ratio is entirely adaptable. If you don’t want bran in it, simple replace it with flour or something like linseed/ sunflower kernels.

No olive oil? Replace with a little extra water.

If you don’t have a starter, just replace the 150g with another tsp of commercial dried yeast. (If you would like to make your own starter- like the lovely Laura did recently- step by step instructions are here. )

cityhippyfarmgirl

Everyday Bread Rolls

150g starter

1 tsp dried yeast

300mls water

1/2 cup unprocessed bran

2 1/2 cups flour

1 1/2 tsp salt

3 tbls olive oil

Add starter, yeast and water together. Whisk and leave for 10 minutes or so. Mix remaining ingredients together and leave for about 30 minutes. Add the salt and then mix or knead again, (I use my mixer.) The dough needs to be smooth and elastic. Leave to prove for a couple of hours, with a couple of knock backs in between.  Shape into rolls and place on a lined tray, allow to prove for another hour or so.

Cook for about 15-20 minutes at 220C-230C with steam.

a hot King’s crown

felt crown- cityhippyfarmgirl

felt crown- cityhippyfarmgirl

felt crown- cityhippyfarmgirl

It’s been hot here lately, really hot.

Tuesday got up to 43C, (that’s around 110 farenheit I think). Tuesday night 9.45pm, I was bringing the washing in and it was still 36C. With a not so lovely straight from an oven hot dry wind to add to it. During the day, with the blinds drawn, the kids playing in a cool water bath, my head turns to thoughts of- why oh why does this country not build better insulated houses? Insulation, double glazing… that’s what I was thinking about sitting on the floor of my bathroom. A country filled with well insulated houses and not an air conditioner to be seen…imagine that.

On hot days like this, going outside wasn’t particularly appealing so I needed an indoor activity that would keep The Monkeys interested. Monkey Boy had been asking me all about Kings and Queens that morning so a crown seemed like a good project.

Will you make me one Mama?

Your Majesty…it would be an honour.

Scrap felt and buttons from my stash, made two crowns. One for The King and the other for his brother the young Prince.

felt crown- cityhippyfarmgirl

skippy barm bread

I had good intentions of following the recipe. It just doesn’t often work out like that.

Two minutes in, actually lets be realistic. Thirty seconds in and I already had done something completely different to what Dan Lepard’s recipe said.

Don’t you read the recipe? Mr Chocolate helpfully said.

Um no… I guess I don’t.

Right. It was pointless in continuing with Dan’s method. Heating the beer up surely couldn’t be a crucial part in the breads success could it? I softly closed the book and resumed hackbaking 101. One day, one day, I might be able to follow a recipe.

One day?

Popping my thinking cap on, I wrote down my own recipe. I quite often write down what I’m going to do before I do it. I look at my ratios, see if it looks right, and then make any adjustments to the ratios as I go along.

With the beer, flour and starter mixed together, I left it over night. Coming back in the morning like an enthusiastic kid waiting to open a present. Would it look like it should? Would be a deflated watery mess? Would it have escaped the bowl and be slowly making its way down the kitchen cupboards, making a clear getting away towards the door?

I peeped inside and happily saw, it looked kind of like how I would expect it to look. Excellent. Now to the bread bit.

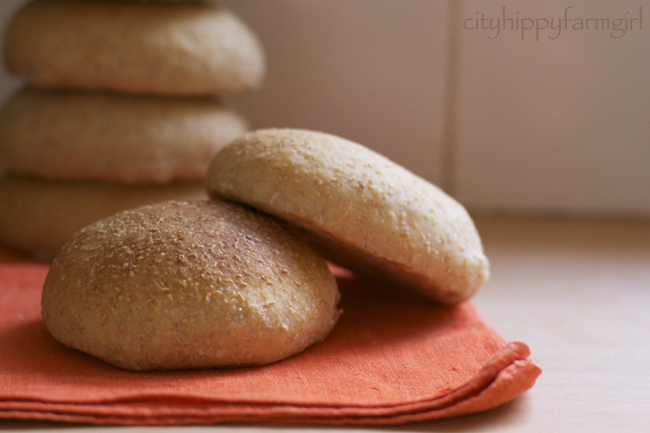
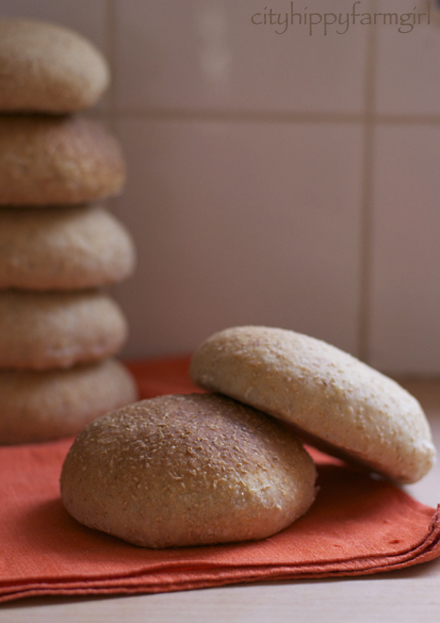
Behaving well, the end of the day and it’s baking time. A shape and a slash. Bake and ….

Happy mama. It looks decent. Mr Chocolate spies it and demands bread rights. I say not a chance, need to take some pictures, and then you can try it and give the crucial Mr Chocolate test.

It passes.

Phew.

* Note, Dan Lepard asks for bottle conditioned beer with live yeast. I didn’t use that, instead just a regular type of beer. Does this mean it’s now not a barm bread, but instead a regular beer bread? Not sure, perhaps perhaps… Any enlightment from the bread gurus?

Skippy Barm Bread

Hack baked  Adapted from Dan Lepard’s The Handmade Loaf

Barm

330mls room temperature beer

1/2 cup (75g) flour

3 good spoonfuls of active sourdough starter (100%)

Whisk together and leave overnight.

Barm Bread

550g barm

4 cups (600g) flour

200mls water

Mix ingredients together and leave for half an hour or so. Add 2 1/2 tsp salt and mix again. Quick knead, and then prove for a while. Another quick fold and then shape. Prove again, slash and then bake at 240C with steam.

I’ve also done an olive bread using the same dough. Just weave your favourite kind of olives through the dough on shaping, prove and then bake. Make sure those olives are really tucked in, otherwise they pop out when baking.

This post submitted to yeast spotting.

B Bread

I have fiddled, twiddled and tweaked this recipe so many times, and I’m still unsure of what to actually call it.

Could it be wholemeal bread? Technically it’s not wholemeal as it doesn’t use the whole grain.

Bran bread doesn’t haven’t much of ring to it. Sounds like something your grandmother might be encouraging you to eat.

Keeps me regular as clock work that Bran Bread does! 

Nope. Bran Bread doesn’t work either.

How about Brown Bread? A bit dreary sounding though isn’t it?

Would you like some lunch? How about some white cheese, red tomato, on some brown bread?

Exciting no?

How about B Bread? It’s got bran, it’s brown, it’s bread, (and it’s made by Brydie.) Yep that will do.   

For such a simple loaf, I really have tweaked it a lot. Has it made a terribly big difference? Probably not.

I have played with higher hydration, (too tricky to shape) short mixes within the autolyse period, longer autolyse period, (I like leaving it about 40 minutes) using hot water mixed with the flour, long over night prove, shorter day proves, big slashes, little slashes, no slashes, (I like them) not soaking the bran (dry bits), adding the dark malt secondary, (too streaky) adding the malt with the bran and hot water, (no difference) shaping before the over night prove, shaping after the over night prove. (I’m still not sure which I prefer with this one. Depends on the time factor at this stage.)

At the end of the day though, it’s a bread that does what all good breads do. Fills your belly in a wholesome, soul uplifting kind of way.


B Bread

400g starter

700g flour (4 2/3 cups)

1 tsp dark malt flour

50g unprocessed bran (1 cup)

125mls hot water

500mls water

2 tsp salt

Add hot water and bran together, mix until all absorbed. Mix starter, flour, water and dark malt flour together for a minute or so, and then add the bran mixture (I use a sunbeam mixer with a dough hook). Rest period 40 mins. Add salt. Mix again. Prove for 1 hour or so. Quick knead on lightly floured surface. Another hour or so prove. Fridge for 12 hours. Shape. Back to room temperature and prove,(took about 3.5 hours). Slash. Baked at 240C with steam, for about 30 minutes.

This post submitted to the wonderful yeastspotting.

Taunting newspapers and Banana Oat Bars

I’m always curious to see what other people are reading.

Passing by a young man with a very long bushman beard at 7am on a Saturday morning recently. I had to stop myself from sticking my head upside down, and asking, “what ya readin’ there buddy?” He seemed so engrossed in his book, sitting reading at the bus stop.  What was that young man with a long bushman’s beard reading at 7am while waiting for his bus?

I love reading, but too often there isn’t enough time in my day. Certainly not enough time to do all the reading that I would like to be doing anyway. I love reading the Saturday paper, but sometimes I simply have to just not buy it. The pressure to read the thing is too much. Who needs that kind of added pressure? A pile of papers slowly mounting up on the table, taunting me in its silence. If the paper could talk I’m sure it would be whispering.

You haven’t read me yet, have you…

I’m still here…you’ve walked by again and I’m still neatly folded.

Come on now, it’s nearly Friday, and I’m still very much unread…

You know what tomorrow is don’t you…paper day, again.

See how the paper taunts me? How a bundle of paper pages does that, I just don’t know.

Along with the newspaper building up, my pile of books to read is also silently gathering momentum. The beginning of the year, I had set out with a reasonable reading list that I thought was manageable given the slow rate I was reading at the time. That one book turned into two, two turned into three, three turned into ten. I can’t keep up. Have I finished any of them? Maybe one or two… But generally they are all half read. I’m simultaneously reading six books.

Now this, probably isn’t the most clever way to read a book but it’s how I’m slowly creeping through them all. There is the book that doesn’t read particularly well, but I really want to get though it as I think it’s important. There is the light reading book for when I’m so tired just before bed that I can still read a little with an eye stuck shut for want of sleep. There is the informative book that needs to be read with a clear mind, while taking down the odd note here and there. There is the escapism fiction that has essentially only been opened and closed without a proper word been consumed. There are the numerous cookbooks that need to be poured over before I can satisfactorily say that yes, I’m utilising them properly. There is the green building magazine that I adore every page of, so don’t want to flick through unmindfully as by doing that it would almost seem an insult and not do the pages proper justice. Then there is the ever growing list of books that I really want to read next.

My books are pressuring me just as that taunting pile of newspapers.  Thankfully these Banana Oat Bars don’t give out that kind of pressure.

Do you ever feel pressure from paper goods?


Banana Oat Bars

2 mashed up bananas

100g melted butter

1 tsp vanilla

1 tsp cinnamon

3 tbls honey

2 cups whole oats

Mix all the ingredients up in order. Press mixture into a greased pan (I used 23cmx 23cm) and bake at 180C for approximately 45 minutes.

Super easy and perfect to nibble on… while you are reading.

chunky chicken macadamia pie

Finally a pastry that I’m really happy with. Natural yogurt, where would I be without you…

Pastry

200gms butter

2 cups plain flour (300gms)

110gms natural yogurt

1 tsp vinegar

In a food processor pulse flour and butter until resembles bread crumbs. Tip out into a bowl and add yogurt and vinegar. Mix through and then knead until a smooth consistency and then pop into the fridge for awhile. Take out and roll to the thickness you want. With a ramekin that’s been turned up side down and wrapped with baking paper, drop it over the top and squish it in a bit.  Then into the oven at about 180C until golden. (I used a spatula about half way through the cooking to flatten the top (which will be the bottom) you don’t have to do this though.

When they are cooked, just flip it gently out and fill with your favourite pie flavours.

Chunky Chicken Macadamia

In a pot add

a good slurp or two of olive oil

4 cloves of diced garlic

chopped up chicken breast or thighs

cook them up until the chicken is cooked through

add two chopped zucchini

a lemon rind strip

a good grind of black pepper

2 tps stock powder

a little water

1 tps dried oregano

and lastly 3 heaped teaspoons of plain flour

cook it all until it thickens a little and smells lemony chickeny.

Pop spoons of the mixture in to the pie shells and add some toasted macadamias or whatever other nut you may have locally.

Basmati Yogurt Breadrolls

I was given Dan Lepard’s, The Handmade Loaf recently by a good friend and inside is a lovely collection of launching pads of recipes. Now as it’s begun to be known around these parts, I can’t follow a recipe to save myself. So with this in mind I saw Dan’s recipe for Rice Bread and thought I could fiddle with that.

Let’s see…

With some basmati languishing in the fridge and yogurt that needed to be seen to as well, these little fellas did me proud. Healthy, with a sourdough-yogurt-basmati mix, they would have to be quite low GI, and they give a bit more oomph to your standard bread roll. Once cooked, I added some chunky cheese and some old lady pickle*, and I was a happy woman.

* Don’t worry, it’s not really made out of old ladies. Just what I call mustard pickles…. usually made by little old ladies.

Basmati Yogurt Breadrolls

(adapted from Dan Lepard’s Rice Bread)

150gms cooked left over basmati rice

110gms yogurt

250gms strong bakers flour

200gms sourdough starter

3/4 tps salt

40mls water

The usual mix, prove, fold, prove, shape, prove. Then baked at 240C for 10 minutes with steam and then another 10 minutes at 220C.

A chewy toothsome breadroll, that also freezes well, and I’m really looking forward to making these again.

This post submitted to the wonderful yeastspotting.


Chocolate Peanut Butter Bread

sourdough rolled in cocoa


It started off as a dare. Chocolate Peanut Butter Icecream bread. What a hoot that would be.

A dare that made me think, ponder a little…. hmmm, I wonder…

What if?….

…and then…

no…maybe… yes?

First incarnation. Not so great. Dense, and lacking flavour. Ditch the milk powder, and chestnut flour. Far too dry as well….

More thought time spent on the next incarnation than should rightfully have been done so. An addition of a biga, add a little honey. Longer prove. I wanted a chewier texture, just a hint of the honey and cocoa, and didn’t want to be banged over the head with the sweetness. I wanted a bread, not a cake.

Second incarnation. Much better. More complex flavours, but still… not right. In the mixing it smells wonderful. Subtle in the flavours, not overly sweet, yep, it all sounds right. I have high hopes for the rising dough… and then it just sort of gives up.

Was it simply something that just doesn’t work. The flavours not holding hands together? Was it something I said?

One more crack. If it didn’t work this time, I would lay it to bready rest.

Third go in. It has the lovely combination of vanilla, honey, butter, sugar, peanut butter, cocoa. All flavours that would normally be working so well, (in a cake). The addition of the biga to give it a bit more oomph and…

It still doesn’t work. It’s dry, lacking in flavour, annoyingly slow to prove and does nothing for me what so ever.

BREADY rest… Let it rest.

Instead I make up a batch of normal sourdough, pop some dark malt flour in it, roll it in some cocoa just before the final prove. Once baked and cut, slap some crunchy peanut butter on it.

Ta dahhh!

Chocolate Peanut Butter Bread.

This post submitted to the wonderful Yeastspotting

Blueberry Rye Sourdough

using fresh blueberries

Jamie Oliver has a recipe called Sexy Swedish Buns. They look tasty, and I would probably quite enjoy them, but they also looked rather messy to make. I must have been missing the sexy part. There were two key ingredients though in the buns that caught my attention. Blueberries and Cardamom.

Still on the hunt for new sourdoughs to concoct, I mused awhile on those two ingredients. Blueberries are subtle and as long as I didn’t go overboard with the cardamom it should work for a sourdough… But, then I was thinking rye. Rye and cardamom…

using dried blueberries

Both ingredients, to me taste of the earth. Not in the way that fresh beetroot does, but in a way that seems to feed the soul. It feels good going in. It feels right after you eat them. My belly seems to sigh a little sigh of contentment after eating either one of them. In the bread, the cardamom doesn’t overpower the rye, the two of them seem to hold hands. Lying entwined together, uncompromising of their own unique tastes.

At risk of sounding like a fluffy hippy who has had one too many snuffs of the patchouli, I have put some thought in to this. Mouthfuls have been mused on, the recipe tweaked, and then tweaked again. The blueberries, while not a strong flavour from the beginning, are just an extra subtle addition to the entwined lovers that be cardamom and rye. The three of them together, seem to make a loaf that’s subtle on the palate and easy on the belly.

Peace brothers and sisters.

Blueberry Rye Sourdough

200gms starter

1 1/2 cup strong bakers flour (150gms approx)

1 cup rye flour (150gms approx)

200mls water (approx)

1 tps cardamom

1/2 cup fresh blueberries (I’ve also used dried blueberries, which were just as good. Soak first.)

1 tps salt

Mix starter, flours, water together. Wait for 20 minutes. Add blueberries, cardamom and salt. Mix again. (Blueberries fall out a little but just keep sticking them in) Prove for an hour or two. Quick fold and shape, and then into the fridge overnight. Back out and bring it back to room temperature. Slash, and bake at 250C with steam.

This post submitted to Yeastspotting.

Honey Oat Sourdough

I want to be a bread geek.

I want to know everything there is to know about yeasts, and flours. The whole process fascinates me. Every time I pull a loaf out of the oven I am amazed at what I have before me. Particularly the wonderful beast that is sourdough. Every loaf is different, each one with it’s own little personality. I want to play with so many different ingredients, then pull it all together into a simple loaf.

Will I ever get to be a bread geek?…I don’t know. My small to medium sized brain seems to struggle with the why’s, how’s and when’s, but I’m slowly getting better. I know I’m geekier than 8 months ago, when I first started on making my own sourdoughs. I also know there is a lot more to learn. I guess that’s all right though…

Bread is a fairly forgiving staple, my family all enjoy the experimenting and I get to muse on the next concoction of dough that I will play with. Wondering on the how, where and when of the loaf coming together, and  loving every part of it.

Pepper the conversation with hydration levels, protein percentages, lames, banettons, biga, poolish, wild yeast, epis and my interest will immediate be sparked. All words that less than a year ago I would have smiled politely and wondered what language you were speaking, as I hadn’t the foggiest idea what you were talking about.

I can put Mr Chocolate to sleep with my constant mutterings and musings when trying to nut out the next bready dilemma I’m having. Lying in bed I’m trying to juggle flour ratios and proving times, while he quietly says the occasional uhuh…and heads out to sleep land. I only realise he has stopped doing his job (being the sounding board that I like him to be), when my question of what do you think? Is greeted with eyes closed, soft nose whistles and the odd body twitch.

Leaving me to my own bready geek talk.

Honey Oat Sourdough

200gms starter

1 1/2 cups strong bakers flour (225gms)

1 cup whole rolled oats (I soaked these in 1/2 cup hot water first)

150mls water (approx)

2 heaped tbls honey

1 tps salt

Mix, prove, fold, prove, shape, long slow overnight ferment in the fridge, bring it back to room temperature. Slash. Bake at 250C with steam.


This post is submitted to the wonderful yeastspotting.


summer loving jam


I don’t know if this was the best name for the jam. It’s been such an odd summer. Bakingly hot this week, a huge cyclone hitting the country and catastrophic flooding in recent weeks. The middle of the night being woken by the smell of a fire, it’s certainly been an odd summer. Fruit and vegetable prices are set to increase due to the natural disasters effecting so many farmers, so I actually feel kind of lucky to be able to even make this jam. To be in a position to cook up and store some of summers beautiful stone fruit offerings. Eaten mindfully and enjoying every spoonful that’s for sure.

Jam really is so easy to make. It’s been said countless times before, but it really is such a great way to preserve the season.

Equal parts sugar to fruit, (generally) if needed some pectin of some sort. Cook it up until it thickens and hey presto, done.

Summer Loving Jam

plums- two kinds

peaches

nectarines

juice of one lemon


ratio

1 kilo fruit

1 kilo sugar

500mls water

I just roughly chopped the fruit and then gently with a hand held mixer, blitzed any big lumps. If you don’t have that, cut it finer, (or enjoy your lumps.)

Cooking at a rolling ball, until cold saucer test stage. In to sterilised jars and store.