Cardamom buns

cardamom buns

almond and sultana buns

almond and sultana cardamom buns

 schakenda

One of my baking friends lent me this book recently.

I didn’t want to give it back.

It was the sort of book that I would quite like to sit on my book shelf and flick through for inspiration now and again. The sort of book I like to bring the pages up nice and close, scrutinise, trying to work out how the devil they made it.

It’s that sort of book, because one- it’s got gorgeous baked goodies in there and two…well I don’t speak a word of Norwegian so scrutinising the pictures is the best way to try and understand what on earth I have to do next.

I reluctantly gave the book back.

With scribbled down notes and mutterings of, more…I must try more, I then did a search for his famous bakery in Lom. The Hairy Bikers visited, and going on the surrounding scenery, the local peoples obvious enthusiasm for the baked goodies and the fact that I’m still having a quiet love affair with all things Scandinavian. Well clearly, I need to go there and eat cardamom buns, probably quite a few. I also possibly need to ask for a short apprenticeship and at the very least, need to keep watching this same segment over and over, so I can get them down pat.

Until then I’ll also keep playing with my own semi sourdough version of them. It’s a versatile dough, that doesn’t mind having things added to it (or eaten just as it is.)

bunss copy

Cardamom Buns

(adapted from Morten Schakenda)

250g sourdough starter

1 tsp dried yeast

600g flour

250mls milk

200mls water

100g sugar

100g softened butter

1 tsp cardamom

1 tsp salt

Add starter, yeast and water together. Whisk and leave for an hour or so. Mix remaining ingredients together and then knead until dough is elastic (I use my mixer)  on a lightly floured surface or until well incorporated and dough is smooth. Leave to prove for a couple of hours, with a couple of knock backs in between.  Shape into rolls and place on a lined tray, allow to prove for another hour or so.

Bake at 180-190 for 15-20 minutes.

blueberry and creme fraiche

blueberry and creme fraiche cardamom buns

This post submitted to yeast spotting

The Singing Dragon

dragon tail

The Singing Dragon

I think a dragon lives at flat number four 

sometimes I hear her singing through the door.

I’m sure she sings all through the night,

keeping her voice low,  so as not to fright. 

Sitting out at the window looking up at the moon,

she lowers her lashes and feels the tune.

Starting down at her tail and rising up from within,

 her song takes her over, causing quite a din.

At day break she stops and gets ready for bed,

cleans her many teeth, and tucking in little Ted.

While she sleeps through the day letting her vocal chords rest, 

I know for tonight she will be singing her best. 

So when the moon rises and your head hits the pillow,

outside the leaves stir and the wind blows the willow.

 Listen carefully for the dragon singing her tune,

when you’re all wrapped up, like a cocoon.

That song you hear now could be dad having a snore,

or it could be the singing dragon at flat number four.

******

for my little people

spelt sourdough baby dragon tail

the nordic return


It had been over a year since I had last made these. A whole year since I had gone all nordic with my reading and eating.

How had a whole year gone by and I hadn’t made them again? Having a baby might have been something to do with it. I got distracted, other things got priorities and slowly time ticked on by.

With my recent jumping in to spelt however, it was time to revisit knekkebrod.

These are ridiculously adaptable and now being made continuously again.

Knekkebrod

* I’m not sure how authentic my version is, but they work for me.

1 cup wholemeal spelt flour

1 cup whole oats

1 cup LSA/sesame seeds/pepitas

small palmful of caraway seeds

1 cup water

Mix it all together and flatten out with wet hands, on a lined baking tray. Divide it partially to the size you want them to be- easy to snap after baking then.

Baked at 160-170C until crisp.

******

I’ve also been playing with Cardamom Buns.

A lovely friend married to a Norwegian fella, gave me a recipe for them the same week that Joanna posted about them. I fiddled with the recipe to tweak it a bit to suit me. With the buns baking, I went and looked up cardamom buns in google… 385,000 possibilities! Probably should have done that before I started baking the buns of goodness, as I was a little underwhelmed with how very average mine looked compared to how they could look.

An hour before they were popped in the oven, I had looked at my proving dough all ready to divide and make pretty. I looked, got completely over whelmed with my lack of time, (laziness) and decided a divided slab would be fine. Sure it was fine, but next baking session I think I will try and make them look a little better and allow more time, (less laziness.)

I had also spotted spelt cardamom buns with marzipan thanks to my good friend google. Oh, oh my! Who knew it could be so good?! Spelt…and cardamom…AND marzipan. Clearly I need in on that action. So no recipe for these buns today, but promises of a bun return.

Or perhaps, a nordic return, (again.)

assistent original- possibly the nerdiest post I’ve ever done

It was finally here.

It, being the mixer I had decided on nearly three months ago. After writing this post. I researched, and researched what was going to be best suited for me. Which one to get… which one to get?

So why did I need a new mixer?

I make all our bread, and although my kids are still quite small, we go through a LOT of bread, so it’s only going to increase. Sourdough being the bread of choice or a sourdough/commercial yeast blend. I quite often use a fairly stiff dough that needs a bit of effort behind it incorporating the salt. While I have no problem with kneading, my kitchen has a problem with bench space… it’s very minimal!

With baby crawling around- getting in to things she probably shouldn’t be, four year old holding on to a leg singing me a sad sailor song, six year old trying to read out his homework, and a dinner pot on the stove probably close to burning. Even just the simple process of kneading salt into dough (in a very small kneading space) can be a little frustrating.

A good mixer, eases this. It really does.

Over the past few years, I had been using a Sunbeam Professional. I was really happy with it and it suited most of my cooking. Although it wasn’t until researching new mixers did I realise just what a flogging I was giving it. At the most I was mixing a little over 3kg of bread dough. The sunbeam recommended amount was less than half that. Lasting two solid years of sourdough making, (plus general kitchen baking 2 years before that.) I’m surprised it lasted as long as it did.

First I looked at the Kitchenaid Artisan KSM150.

Gorgeous colours, and looks solid. $749, 300watt motor, made in the USA, but only takes 1.3k of dough. Reviews also say it can run a little hot when being put to the test with bread dough, needing frequent cool off periods. It also may have times of creeping up the hook, if there is a larger amount of dough in there.

Kitchenaid Professional has definitely got more grunt and aims higher than the average home baker needs. However, as far as I could see it wasn’t available in Australia.

Next I looked at the Kenwood Premier Major KMM770.

No colour options (silver), 1200watts, 2.4kg dough capacity, 6.7L bowl capacity, and upwards of $700. Originally a British company, and is now all made in China.

The Kenwood Titanium Major was also a contender, with same colour, an increase in the watts- 1500, but no increase in dough capacity or bowl size. I was getting mixed messages as to whether an increased wattage in the different machines actually made any difference or not.

These machines did sound ok, but the dough amount still wasn’t enough and it was a sizeable machine for something that still wasn’t quite what I needed. Problems I had read about the Kenwood was ‘walking’ when it’s on and really noisy for the older machines, (not sure about the new ones.)

The Varimixer Bear Teddy- 5L I looked at, but the weight was concerning as the spot where the mixer was to go is again quite small. A lone stockist in Sydney was also quite vague.

Throughout my research another name kept popping up, Assistent Original. There didn’t seem to be any distribution in Australia, despite it being available seemingly everywhere else. It certainly didn’t look anything like any of the other planetary mixers I had looked at.

It did however, seem to be exactly what I was looking for.

Not too big, 7L bowl, could handle up to 5kg of dough, came with basic attachments and more if I needed them later.

It sounded good, really good.

But how to get one of these little gems? I didn’t think it would hurt to send an email, which went to a US distributer. That, then got bounced to Sweden, who in turn bounced it back to Australia, to a baking company who just so happened to be starting to import them. One load of ten had already arrived and disappeared into baking land, a second was to be shipped the next week from Germany. Was I interested?

Hell yes!

Fast forward several months, now with my Swedish mixer in my hot little hands… what could it do?

Let’s find out.

First up the instruction manual is not great. I watched the instructional dvd (also available on youtube) and that helped. I basically fiddled until I had worked out what was what,and mostly it was fine, (you do just have to play a bit.) The dough hook took the longest to get the hang of, (saying that, it was probably only half an hour) which worried me a little as this was the one I basically got the whole thing for. Finally I found if I brought the arm just a smidge more forward, the peg sat in fine.

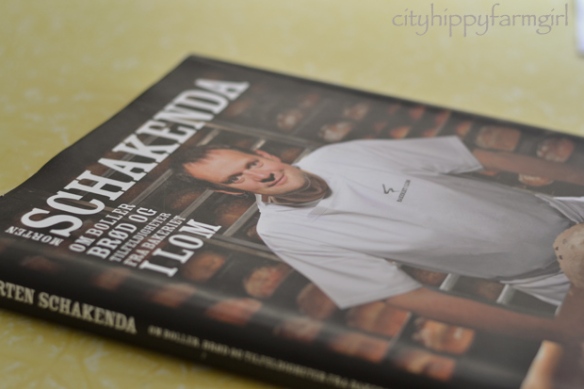
There is an extensive recipe booklet that comes with it. It would be great to explore some Swedish recipes, but unfortunately it’s all in Swedish, and I can read not a word. With distribution of the machine in a handful of English speaking countries, I’m surprised they haven’t done an English language one.

In a nutshell…

Comes in lots of different colours- I got cream

800W and weighs 8.6kg. $682 plus postage

Developed, designed and manufactured in Sweden.

Has been around since the 1940’s

Previously known as DLX Electrolux, Magic Mill Verona- now known as my new kitchen love

Basic model comes with a dough hook, double whisk, cake beater, bowl scraper, dough roll, and lid

In built timer- this is sooooo handy. Dial it up and go and do other things, come back and viola.

It’s quiet. All you hear is a gentle mixing sound on the lowest setting, which for my bread is more than adequate.

When to use the different attachments- I’ve made, biscuit dough and cake batter with the double whisk, cake beater and dough roll. There isn’t a huge difference in the over all result. They all come up with the goods in the end. Dough hook definitely for the larger amounts of bread dough though. Initially I thought it wasn’t doing a whole lot, but it is. (Just be patient and let it do it’s thing.)

I was curious to know whether it could whisk a couple of egg whites as well as several kilos of bread dough. It could, and did. I haven’t done less than 3 egg whites at this stage, but for those three it worked beautifully.

The mixer has a lot more attachments available, and if I decide I want others down the track I can buy them singularly. For the time being though, the basic attachments suit my needs.

Problems with the machine- none what so ever. I’ll certainly edit this post if I come across any problems, but so far- using it is great. I’m still at the casually polish it as I walk by stage.

It is completely different to the other types of mixers on the market, which initially felt a little daunting on opening the box. I soon shook that off though…it’s good to be different. I’d be quite happy to have a machine like this in my kitchen for the next 20 years.

*******

Have a look here, if you want to see it in action using the dough hook.

Other reviews that might be handy and of interest

Planetary mixer advice– on sourdough.com (Australia)

Assistent Original vs Kitchenaid-  (USA)

******

Where to buy it from if you are in Australia?

Blackwood Lane– who were very helpful when I had a lot of questions to ask before I purchased.

* I don’t get anything by writing this review, this is purely to help out anyone that might be in a similar position, looking for a new mixer and unsure of what to get for their baking needs. Would I recommend it?… Yes, it’s awesome.

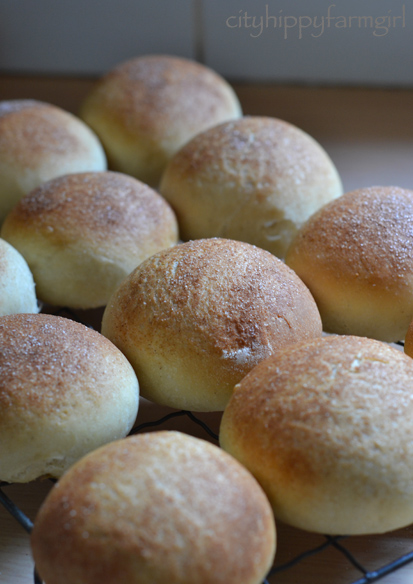
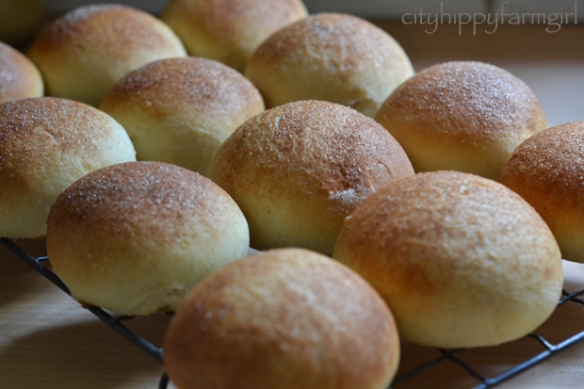
** All food pictured has been mixed in the Assistent Original. 

Honey Spiced Spelt Scones and other spelt goodness


I’m having a love affair with spelt at the moment. I’d been meaning to for quite some time, and then finally I bought some, the love affair could begin.

I had dibble dabbled a little before but not like this. Not 10kg bag fulls of the wholesome goodness that it is. Sourdough loaves were switched to spelt, a variety of scones were made with spelt, caramelised onion sourdough rings were ripped apart, toasted spelt muesli was munched on, spelt and walnut bread rolls were teamed up with swiss cheese and inhaled. Spelt knekkebrod was revisited and spelt pancakes were jostled over. Slowly my bag full of spelt, got smaller and smaller.

It’s an ancient grain that has seen a relatively recent revival. Giving a slightly nutty flavour, I’ve just been substituting it with my regular flours and decreasing the liquid in the recipes. The Monkey’s haven’t noticed anything different funnily enough and still eating everything with boyhood enthusiasm. All baked goods have got a thumbs up from Mr Chocolate, and me?

Well I just think it’s a whole bundle of spelt goodness.

Honey Spiced Spelt Scones

1 1/2 cups s/r flour

1 1/2 cups wholemeal spelt flour

a pinch of salt

a pinch of cardamom, cinnamon, ginger

1 cup cream

1 cup water

2 heaped tablespoons honey

Lightly mix wet ingredients to dry, and turn out to a really well floured surface. Lightly knead using your finger tips mostly, bringing it all together (you don’t want to handle it a lot.) Cut into circles (an upturned glass works well.) and place on a greased or lined baking tray. Bake at 220C for approximately 20 mins or until a light golden.

Spelt Pancakes

50g melted butter

1 beaten egg

1 1/2 cups spelt flour

1 1/2 cups milk

experimenting- sometimes it pays off and sometimes…

Sometimes my experimenting in the kitchen pays off, sometimes…not quite so much.

Take it from me, mashed wasabi potatoes with purple carrots doesn’t work. It should have, but it didn’t. It really, really didn’t work.

I should have taken a picture of the gluey mess that this dish was. Just for the comedic value of how badly  it lay on our plates. I’m not sure what was the clincher, but it was like eating funny tasting soupy playdough. (With out the fun of having played with it before hand.)

The Monkeys refused to go near it, purple wasn’t for them. Mr Chocolate bravely tried to plod through it until I told it was ok, he really didn’t have to be so brave.  I also gave up after the multiple sips of water in between, just trying to get the sucker down.

So no, I won’t be trying that one again, (and perhaps I shouldn’t have been experimenting on Mr Chocolate’s birthday.)

Lucky for me (and lucky for everyone else involved) these scrolls I have also been experimenting with lately didn’t have the same effect as the purple wasabi playdough.

Pesto Parmesan Scrolls

150g starter

1 tsp yeast

60mls tepid water

100g melted butter

125mls milk

1 1/4 salt

3 cups flour (450g)

pesto

parmesan

Add starter, yeast and water-  together. Whisk and leave for an hour or so. Mix remaining ingredients together and then knead for 5 minutes on a lightly floured surface or until well incorporated and dough is smooth. Leave to prove for a couple of hours. Roll out to a rectangle. Spoon pesto on, grate some parmesan. Roll up dough, slice into portions. Place on a lined tray, allow to prove for another hour or so. Bake at 190 for 20-25 minutes.

In my kitchen…

This week in my kitchen…

There is a whole lot of wonderful limes from my dad’s backyard tree. I’ve mentioned my love of the humble lime quite a few times, I never get tired of them. I’m thinking Coconut Lime Pie, Chicken Lime Pasta, Lime Cupcakes, Lime Marmalade… limes, limes, limes. (I’m trying not to think about caipiroska’s.)

Dark Almond chocolate for strength, patience and clarity. Works a treat… well for a little while anyway.

A new Italian cookbook. Won over at Not Quite Nigella, (which was a rather lovely surprise.)

Organic, spray free, local, seasonal fruit and vegetable box delivered to my kitchen door. Making life a little easier until I can get back to my farmers market lady.

Baking hotcross buns with a sleeping babe attached. It’s how all the bakers are doing it these days, (well ones with new babies anyway.)

Last year I did a few batches of hot cross buns. Trying to find the right recipe that worked for me. I still wanted to tweak it though, as didn’t feel it was quite ‘right’. This time I did part sourdough, part dried yeast… I’m getting there I think.

Hot Cross Buns

200g currants/raisins

200mls hot water

2 tsp cinnamon

1/2 tsp nutmeg

1/2 tsp cardamom

1/2 tsp dark malt flour

1 tsp dried yeast

250g sourdough starter

100g sugar (2/3 cup, more if you like them sweeter)

250mls milk

100g softened butter

11/2-2 tsp salt

4 1/2 cups flour (675g)

Soak the fruit in the hot water, leave for a couple of hours/ over night.  Mix all ingredients together, except for the salt. Autolyse period 20-45 minutes. Add the salt and mix again, then turn out on to a lightly floured bench to knead until you get a lovely smooth ball of dough. Pop the dough back into the bowl, plastic bag over the top and leave to prove.  A couple of proves and folds over the next few hours. Then out onto lightly floured surface again and divide into 16 or so portions. Roll into balls, or simply divide to get a more square shape. Pop them on a lined baking tray, cover and leave for another prove.

Crosses

1/2 cup flour

1/4 cup sugar

1/4 water

Mix together and spoon into a piping bag just before they hit the oven.

Then bake at 210C for approximately 15-25 minutes, (until golden.)

******

What’s happening in your kitchen this week?

Have a look over at Fig Jam and Lime Cordial for other kitchen happenings.

sweeping the flour off

the 'flour' after it had been swept...

I’m just sweeping the flour off mama.

It’s a line like that, that stops a girl in her tracks. Stops her right dead in her tracks. Eyebrows fly up and mouth forms a perfectly formed silent O.

Ohh…really little one? Hoping that my first thought after hearing that one little line was wrong… really wrong.

He clarified it for me, by repeating the gesture. See, mama… this how I sweep off allll the flour.

The dirty old house broom gets raised once again, to sweep off the icing sugar delicately dusted over my newly baked Pan de Mallorca.

Nooo!!… Startled and quite surprised he’s the one that now stops dead in his tracks.

I think that’s fine little one, oh, yes…quite enough sweeping I think. Gently prising the broom handle from his Little Monkey paws.

I was only gone five minutes. That three year old is a quick one to tidy.

'flourless' pan de mallorca

I made these last weekend, and again this weekend. I wanted something easy, Monkey friendly and something I could whack in the freezer, ready to be pulled out for standby Monkey Boy school lunches and Little Monkey at home lunches when things were looking just a bit too crazy in the mornings for much else. They both loved them, which is lucky as the crazy mornings happened quite a bit last week.

Pan De Mallorca

(adapted from SBS Feast Magazine March edition)

(and very similar to the Pan de Leche that I’ve made before)

1 tsp dried yeast

100g melted butter

1/4 cup (55g) sugar

3 egg yolks

1/2 cup (125mls) milk

3 cups (450g) flour

3/4 tsp salt

100-150g sourdough starter *

extra brown sugar and cinnamon (or a cooked up diced apple tastes great too.)

In a bowl, add dried yeast, sugar, sourdough starter and 60mls tepid water. Stir to dissolve and set aside for 5 minutes until mixture begins to bubble. Add remaining ingredients and mix well. Turn out on to a lightly floured surface for a quick knead. Mixture should look smooth and elastic.

Pop back in the bowl and cover, leaving to prove for about an hour. Turn out on to lightly floured surface again, rolling dough out into a rectangle shape. Sprinkle several spoonfuls of brown sugar and a little cinnamon onto dough and roll up, (from the long side.) Cut dough into circles and place on a tray. Cover and prove again for about 30-60 mins, bake at 180C for 25 minutes.

Dust with ‘flour’, (icing sugar)

* If you don’t have a sourdough starter, using just the dried yeast is fine, take out half a cup of the flour from the mixture to adjust the recipe.

(This post submitted to yeastspotting)

cherry plum and almond wreath

cherry plum and almond

A baking challenge?

You bet.

How could I not. It looked delicious. The taste possibilities were endless, and it looked like just the thing to tickle The Monkeys taste buds.

Make it with local seasonal fruit, even better.

peach and blueberry

For how to make one of these wreaths, pop over to Discovering Sourdough.

I’ve written down the changes I’ve made, but it will make more sense if you check out the original recipe first.

Cherry Plum and Almond Wreath

200mls milk

3 tbls sour cream

50g butter

50g sugar

Warm ingredients gently and then cool a little and add

210mls water

Set aside.

450g starter  (100%)

650g strong bakers flour

Mix together with liquid mixture and let autolyse for an hour.

2 tsp salt

Add the salt, mixing well with dough hooks.

200g strong bakers flour

Then out on to a well floured board and incorporate the extra 200g of flour. Slowly and over about 10 plus minutes.

Prove for 3 hours

Cherry Plum and Almond Mixture

6 blood plums cut up

large handful of fresh cherries, pips out

3/4 cup of sugar

Cooked up for a few minutes until soft, draining any excess juice off and stir through a large handful of blitzed almonds, (or almond meal if you already have it.)

Peach and Blueberry

Peach Punch Jam

fresh farmers market blueberries

This post submitted to yeastspotting.

skippy barm bread

I had good intentions of following the recipe. It just doesn’t often work out like that.

Two minutes in, actually lets be realistic. Thirty seconds in and I already had done something completely different to what Dan Lepard’s recipe said.

Don’t you read the recipe? Mr Chocolate helpfully said.

Um no… I guess I don’t.

Right. It was pointless in continuing with Dan’s method. Heating the beer up surely couldn’t be a crucial part in the breads success could it? I softly closed the book and resumed hackbaking 101. One day, one day, I might be able to follow a recipe.

One day?

Popping my thinking cap on, I wrote down my own recipe. I quite often write down what I’m going to do before I do it. I look at my ratios, see if it looks right, and then make any adjustments to the ratios as I go along.

With the beer, flour and starter mixed together, I left it over night. Coming back in the morning like an enthusiastic kid waiting to open a present. Would it look like it should? Would be a deflated watery mess? Would it have escaped the bowl and be slowly making its way down the kitchen cupboards, making a clear getting away towards the door?

I peeped inside and happily saw, it looked kind of like how I would expect it to look. Excellent. Now to the bread bit.

Behaving well, the end of the day and it’s baking time. A shape and a slash. Bake and ….

Happy mama. It looks decent. Mr Chocolate spies it and demands bread rights. I say not a chance, need to take some pictures, and then you can try it and give the crucial Mr Chocolate test.

It passes.

Phew.

* Note, Dan Lepard asks for bottle conditioned beer with live yeast. I didn’t use that, instead just a regular type of beer. Does this mean it’s now not a barm bread, but instead a regular beer bread? Not sure, perhaps perhaps… Any enlightment from the bread gurus?

Skippy Barm Bread

Hack baked  Adapted from Dan Lepard’s The Handmade Loaf

Barm

330mls room temperature beer

1/2 cup (75g) flour

3 good spoonfuls of active sourdough starter (100%)

Whisk together and leave overnight.

Barm Bread

550g barm

4 cups (600g) flour

200mls water

Mix ingredients together and leave for half an hour or so. Add 2 1/2 tsp salt and mix again. Quick knead, and then prove for a while. Another quick fold and then shape. Prove again, slash and then bake at 240C with steam.

I’ve also done an olive bread using the same dough. Just weave your favourite kind of olives through the dough on shaping, prove and then bake. Make sure those olives are really tucked in, otherwise they pop out when baking.

This post submitted to yeast spotting.

fiesta bread cones

There was a birthday fiesta in the air and I had some bread rolls to make and take.

I had been given some cream horn moulds from a friend and along with lots of planned pastry goodies, I also wanted to make some bread rolls. I did a trial run and they seemed to work well. The Monkeys had inhaled them, so I thought they would be good enough to take to the birthday fiesta planned for the weekend.

First up, make some dough. I used the very versatile olive oil bread recipe. When it comes to the shaping stage, divide the dough into even pieces, (approx 1/16 with this amount of dough, with a little left over- I made 17 cone rolls).

Roll them into skinny lengths. Making sure all the bubbles are out. Roll them on an unfloured surface, you want a bit of stick to be able to roll properly.

Once they are rolled them dust them with a little flour, you want them to keep the rolled shape, when proving.

Lightly oil your cone moulds and then roll the dough along the mould. I found it was easier to keep on the bench rather than holding it up and winding it round.

Plain ones are easy or using a little oil and then a light dusting of poppy seeds.

Bake in oven at 240C with steam, for approximately 15 minutes. Oven time is going to vary, I would start watching them like a hawk from the ten minute mark.

Stuff them full of anything that takes your fancy.

We had these with beans, chicken, guacamole and sour cream, (or as The Monkeys and their Monkey Cousins did, stuff a sausage in there so as not to cut in on any essential play time.

Tips * When winding them up, don’t let the dough go over the lip of the cone mould, the bread will bake over and be difficult to get out. When taking the mould out, do it while the bread is still warm.

*****

This post submitted to the wonderful holiday version of yeastspotting.

miracle Pumpernickel

I was in the middle of making this pumpernickel bread and all I could think of over and over again was…. it would take a miracle. (Said in the voice of Miracle Max from The Princess Bride.) For it really was going to take a miracle for this little loaf to work.

I had scanned and then re-scanned recipes for it, and either the recipe wasn’t what I was after or I didn’t have access to some of the listed ingredients. I re-read some more, until all I felt was, like a dog chasing it’s tail. Funny for someone else watching but rather annoying for the poor dog.

What?… How?… Maybe?… Oh crikey.

Nothing else for it. Jumping in and back to hack basics 101. I had a general idea of how it was supposed to be cooked, and I had a pretty solid idea of how I wanted it to look and taste, so off to the kitchen it was.

First I got some rye grain, as I couldn’t get the kind of rye flour or rye meal I was after. Then popped it in my Kitchenaid blender and pulverised it to make a course flour… pickle me in ginger if that didn’t work. I didn’t even know my Kitchenaid could do that. Whoosh!

With flour now in hand, I started on the rest of the loaf. I really felt out of my depths with this one, just because I was solely going on instinct and guessing and not following someone else’s tried and true pumpernickel recipe. Hence, the many mutterings of …it would take a miracle.

But it did work, and I was really happy with it. Dense, flavourful and definitely one I will be making regularly. It had both sweet and sour flavours, very little crust, and quite sustaining for a small slice. It’s not a quick loaf and does take a bit of preparation but I would much rather be eating a pumpernickel coming out of my kitchen as opposed to an imported one coming from Europe, (as that is a LOT of food miles for a small amount of bread.)

Pumpernickel

250g rye flour

200g starter (100%)

50g linseed meal

50g sunflower seeds

25g unprocessed wheat bran

1 tsp dark malt flour

handful pumpkin kernels

200mls boiling water

120mls natural yogurt

1 tsp salt

In a bowl add linseed, sunflower seeds, dark malt flour, wheat bran, pumpkin kernels and boiling water. Whisk together and leave to soak for several hours. Then add starter, rye flour and yogurt. Mix slowly a couple of times, with 10 minute rest intervals in between. Then add the salt and mix well again. In an oiled and lined with baking paper tin spoon mixture in. Making sure there is no gaps. Cover and prove until risen by about a quarter. This took for me about 7 hours, will depend on the room temperature though.

Cover with aluminium foil and bake at 220C for 15 minutes, then lowering the temperature to 190C bake for approximately 35 minutes.

Cool in tin for 15 minutes, keeping the aluminium on. Then remove from tin, and cool on rack. When it’s cold, wrap it in baking paper for 24-48 hours before eating.

*******

and just because I can….

this post submitted to the wonderful yeastspotting