Passionfruit Cake

passionfruit cake

Chocolate cake with coffee icing.

It’s the cake I would make for mum each and every birthday when I was a teenager. The chocolate cake recipe was an ever reliable one from a Women’s Weekly Cookbook and the instant coffee icing would more often than not be dotted with a few stale old walnut halves to decorate. For years I never strayed from that recipe, (dry old thing it was.)

One year it was extra special, I forgot the eggs (or I think that’s what happened.) I gently tipped the cake out and splat. The whole thing landed on the cake rack in a thousand chocolatey bread crumbs. No one else was home, it was supposed to be a surprise. What on earth was I going to do?

In tears I tried to salvage the crumbs and somehow press them into a cake shape, (you see cake pops hadn’t been invented yet.) I pressed and pressed and then covered the whole thing with a thick coffee icing, trying to ignore the big wet salty tears that still occasionally landed on top. Mum got home and I offered up the lumpy shaped dome with the tear smudged icing…Happy Birthday Mum, I whispered with a slightly quivered bottom lip.

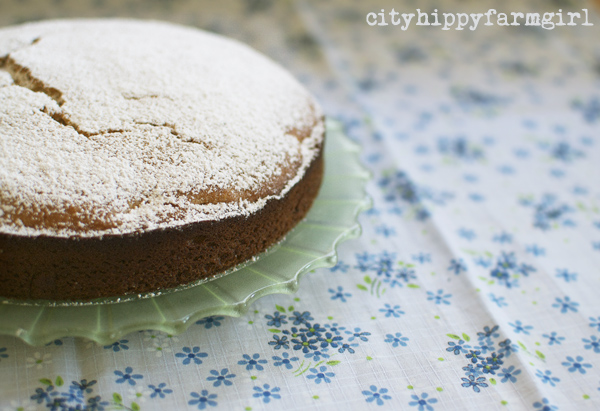
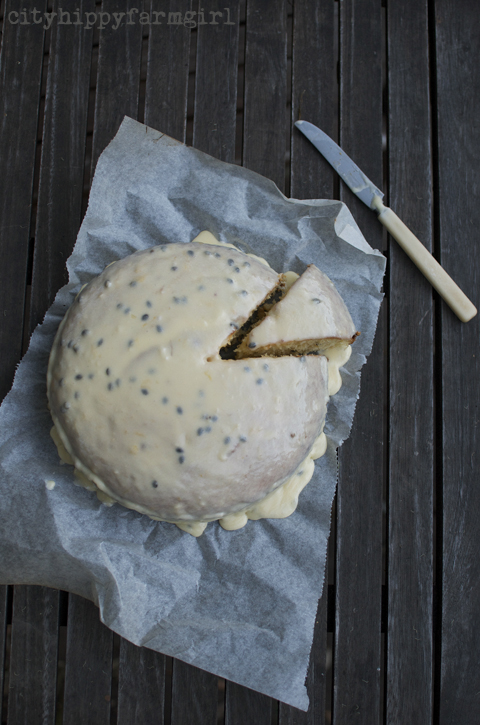
A crumbly chocolate cake with coffee icing this isn’t. If my mum wasn’t currently kicking up her heals at the moment in Europe I think I would have made this Passionfruit Cake for her instead. There is nothing fancy about it, just a simple cake that’s moist, not crazy sweet, really easy to make and not remotely like that dry old chocolate cake I used to make.
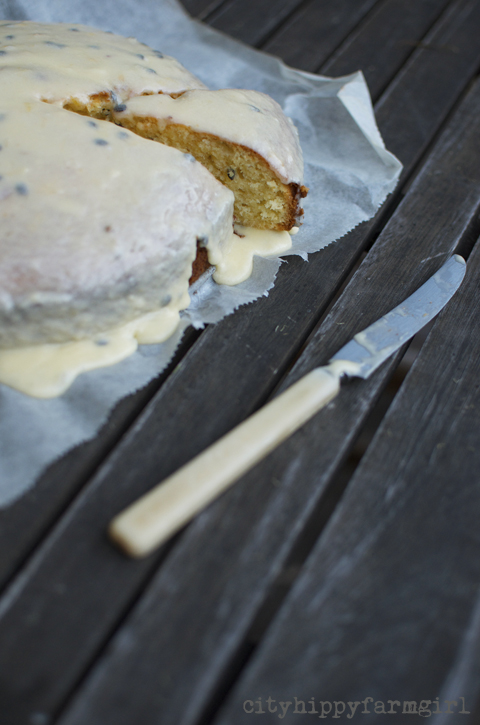
passionfruit cake

Passionfruit Cake

150g softened butter

150g caster sugar

3 beaten eggs

pulp of five passionfruit

225g self raising flour

Cream butter and sugar together until pale, then add eggs. Next add passionfruit pulp and flour. Bake in a greased and lined spring form tin at 180C for approximately 40 minutes.

Passionfruit Icing

25g softened butter

icing sugar

pulp from 1 passionfruit

juice from 1/2 a lemon

Perfectly Pecan

cityhippyfarmgirl

Mmm, yum Anzac Biscuits…

They’re not Anzac Biscuits, I cut in with, probably a little indignantly…take another bite.

He takes another bite… Mmm, Anzac Biscuits!

Sigh. Oh forget it.

These are not Anzac Biscuits, (despite having oats and golden syrup in them) and looking a little (ahem) like them. Ground pecans is the secret ingredient here, combined with wholemeal spelt flour, and giving them a little earthier flavour. Just the thing to throw out to hungry small kids on school holidays, (who also seem to have an ever increasing appetite for…well pretty much everything.)

So if they’re not Anzac Biscuits, what do you call them?

Um…errr, um, (cough cough)… Perfectly Pecan Biscuits?

cityhippyfarmgirl

Perfectly Pecan Biscuits

200g pecans (in processor)

150 whole rolled oats

150g melted butter

100g golden syrup*

1 tsp vanilla

75g wholemeal spelt flour

In a bowl add all the dry ingredients and then also add the combined melted butter and golden syrup. Roll to a ball, and pop onto a tray. Gently flatten biscuits down and bake at 180C for about 20-25 minutes.

* These aren’t overly sweet. If you like your biscuits on the sweeter side add 50-100g of brown sugar.

Ginger Pear Cake and a mug of peacefulness

cityhippyfarmgirl

cityhippyfarmgirl

Looking up at the man I couldn’t help but have a quiet inward chuckle.

There he stood, poised, peaceful and completely in the moment. Sipping from his steaming mug, looking out over the morning sun lit park. Not once did he glance over to the hurrying mother of three, storming up the hill in an effort to get to school on time. Why would he? Bringing the cup slowly up to his lips with two gentle hands on either side, he was very much there, in his moment. His moment of stillness and quiet enjoyment. 

Why did this man on the balcony strike me so much on a sunny day at the end of the week?

Because he was in complete contrast to my morning, actually my whole week. It had been a busy one and on this day, it had been my cup of tea that had paid the price. The first was inhaled at 5.35am, the ambitious second cup was then microwaved for an uninspiring four times.

You don’t microwave tea! I hear you exclaim. I know, but I did. I do sometimes. As far too often that beautifully made up pot of tea, has been poured and left on the bench as something more pressing needs my attention. Four times that cup had been microwaved, and when it needed a fifth go, I gave up. We had to leave anyway, and that’s when I saw that man on his balcony.

With his steaming mug of solitude and peacefulness.

***************

I have a far more complicated (similar) recipe in my head for this cake, however on days where you find yourself microwaving your tea… simple cooking is called for and a blender cake fits the bill. 

cityhippyfarmgirl

Ginger Pear Cake

150g softened butter

150g brown sugar

2 tsp vanilla

2 tsp powdered ginger

2 eggs

2 peeled and cored soft pears*

75g glace ginger, roughly chopped

225g self raising flour

In a blender mix all ingredients together except flour and glace ginger. Pour wet mixture out into a bowl and fold through flour and roughly chopped ginger. Pop into a greased and lined cake tin and bake at 180C for about 40-50 minutes.

When cooled, dust with icing sugar and have with a mug of hot tea.

* In season at the moment if you live in Australia

Baked Ricotta- Frugal Friday

baked ricotta

This is a ridiculously simple dish, where the possibilities are endless of what to team it up with. Add extra different types of cheese, fresh garden herbs, chilli, bacon pieces, shallots… endless I tell you.

A side salad or some roasted vegetables to go with it and a simple Friday night dinner is done. Five minutes tops, to put it all together.

Baked Ricotta

350g ricotta

3 eggs

75g self raising flour

50g melted butter

1 tsp oregano

salt and pepper to taste.

Beat eggs, mix through everything else except flour, and then fold that through too. Pop it into a greased pie dish (or something similar) and bake at 200C until puffed up and golden, (about 35 minutes.)

Pistachio and Vanilla Panna Cotta with Persian Pashmak

panna cotta

I was a little nervous about using the Pashmak. I hadn’t really understood why until it came out in an email to the revered foodie Tania. I had asked her for some input on what to make with the goods and suddenly it became abundantly clear to me… I was nervous because this Persian fairy floss was dainty and delicate.

Dainty, delicate… and pink!

Not three words that I would usually string together in my cooking. Rustic yes, every day yes, basic yes…but dainty and delicate? Not really.

I’d bought it with grand visions, plans changed, ideas came and went, and so did the time. When are you going to use that stuff? said Mr Chocolate helpfully… Soon, really soon.

Cupcakes possibly… a cake could be good…or perhaps a little panna cotta?

Now panna cotta sounded like the right thing although along with never having played with pashmak before I’d never tried making panna cotta before, or used gelatine for that matter.

Well that was my answer wasn’t it. The one that I had the least amount of knowledge on, and only a fluffy idea forming, well that would be the one. Of course it would be, it’s the cityhippyfarmgirl way. Hackbaking I like to call it, (and if it all ended up in colourful sloppy mess in a bowl? I had a sneaking suspicion we’d still eat it.)

cityhippyfarmgirl

Pistachio and Vanilla Panna Cotta

300mls cream

150g natural yogurt

50mls water

75g raw sugar

 1 tsp vanilla

60 mls water

2 1/2 tsp powder gelatine

Sprinkle the gelatin over the water, dissolving it. In a pot add the cream, yogurt and sugar- gently heat to dissolve the sugar. Cool a little, and add the gelatine mixture and vanilla, dissolve again.  Pour into individual glasses and chill for about 3 hours.

40g lightly roasted pistachios- roughly crushed

Persian Pashmak*

*********

* Pashmak wilts in humidity…a lot!

If you like rose water, you can swap this for the vanilla.

a triumphant beetroot

We eyed each other off. Me on one side, it laying boldly on top. My shoulders slump a little, my breath exhales slowly and I gingerly pick it up.

I can’t help but sigh. There we were again, looking eye to… well foliage, with the same old dilemma. What to do with you beetroot?

You see, beetroot and I were not friends. We never were. Sure, his trashy cousin from the can was fine. Actually rather enjoyable slapped on to a weekend burger, but it was this guy. The plump, rounded, red, rooted vegetable that kept cropping up in my vegetable box. Time and time again, there he was. When will this damn beetroot season end?

I had tried to like it, I really had. Steamed…ick. Pan fried…ick. Drowned in balsamic and goats cheese…ick. Chocolate cake…ok, that one was fine, but I didn’t want to be making that all the time. Nothing seemed to make those red bulbs tasty, the earthy taste of it just stuck to it. I didn’t like it as a kid and I didn’t like it as an adult.

So I gave them away. Happily dropped them off to a neighbour. Passed them on to a friend at school. No dilemma, no thought… here you go, they’re all yours! Big lovely red bunches of them.

Another week went by and it happened again. A top of the vegetable box, sitting proudly in all its rounded red glory, the plumpest, most delicious looking fat beets you had ever seen. (Yes, despite me thinking they tasted ick, I could still value their beauty.)

I sighed… come on, you can do this I whispered to myself… try again. So I instagrammed them, got a lovely lot of suggestions of what to do with them and then turned my oven on. Roasted was suggested, and roasted it was. I hadn’t tried that way yet, maybe, just maybe this was the way to make it slightly palatable.

And it was, it so was. That earthiness that I couldn’t shake before seemed to have disappeared. Leaving instead a sweetness (that rather surprisingly) was quite delicious.

Roasted Beetroot and Pistachio Dip

On a tray into the oven with your whole fat beets at about 180C, (they’re done when you can slip a knife in easily.)

the skin can easily be peeled off when you’ve done this-

chop in to rough pieces and add

a handful of roasted pistachio

salt and pepper to taste

blitz it all with a hand held mixer

and then stir though four heaped dessert spoonfuls of natural yogurt

******

We ate this with a little spelt sourdough, and also on top of pumpkin soup- which had some great colours.

For all those who already eat roasted beetroot and are thinking well, duh Brydie…of course that’s the best way! What can I say? Sometimes, things run a little slower round these parts.

making ginger beer…it will put hairs on your chest

That is bloody beautiful…

There had a been a lot riding on that first taste. It seemed I’d passed though, I had passed the dad taste test. My father had many decades before, made ginger beer for several summers of his childhood. Happily filling the garage with his ginger beer bottles, the occasional pop as a bottle exploded and many glasses of bubbly gingery goodness enjoyed. Now it was my time to give it a go.

Last year Mr Chocolate acquired a taste for ginger beer. It was the drink of choice, the bottle to go looking for at the back of fridge. Thirst quenching, refreshing, gingery and really tasty. Of course I wanted to give it a go, I had to didn’t I? If there was another sort of fermentation process to try, I wanted in.

So I researched how to do it, and in doing so, it seemed a bit like making sourdough… 501 methods to choose from. None of the methods I read seemed exactly suited to me, so I thought I would just play and see how it turned out. Several batches in and I think I’m finally at a method I’m happy with.

Ginger Beer

1/2 tsp dried yeast

1 tsp dried ginger

1 tsp raw sugar

1 cup luke warm water

Add ingredients together in something like a large glass bottle. Shake it around a bit. To the top, with a rubber band attach a small square of muslin.

Daily for seven days, adding 1 tsp ginger and 1 tsp sugar each day.

Day eight- strain with a muslin lined sieve, into a bowl.  Using 2 cups of sugar and the  juice of 2 lemons add to the mixture and stir to dissolve. Pour  mixture equally into 2 x 1.5 litre plastic bottles. Top up with tap water, leaving about two inches from the top to allow for gases to build up.

Put remaining ginger sludge (this is called the plant or mother) back into the glass jar with 1 cup of water.

Bottles leave out on the kitchen bench, for 2-3 days (longer in cooler weather). Tip upside down once a day to dissolve any sugar sitting at the bottom. You’ll be able to feel the gases build up by the tightness of the bottle.

Pop into the fridge and chill.

Gingery, sweet and ready to drink.

a gathering

Last weekend we had a gathering

an afternoon to come together with shared food, simple decorations, no structured time, one table, lots of rugs and plenty of conversation

“All ukeleles, hulahoops, guitars, fire twirling, bongos, bubbles and barefeet are actively encouraged…”

an open green space giving shade and freedom to

20 adults and 28 children


When city living can feel so incredibly rushed, hurried, structured and small. Gatherings like this are like a breath of fresh air.

Recharging the batteries, giving adults time to stop, slow down and talk. Children time to do what they do best…run off and explore, creating their own games.

I absolutely adore afternoons like this…

Thank you friends.

tortilla de patatas- Frugal Friday

Tapas is one thing that Mr Chocolate has a real soft spot for. Anything that involves small dishes being brought to the table with lashings of olive oil over it, there is a good chance he’s straight in there with a fork at the ready.

Our first proper date was at a tapas restaurant. Dark walls, candle lit tables, and jugs of sangria dotted the various tables. Being fluent in Spanish, he encouraged me to try out some words he had just taught me on the wait staff. As my language skills at that stage were limited to “dos cervezas por favor”, any spanish chit chat on my part was questionable.

However the night was young, the sangria was good and my spanish got better. It wasn’t long before our table was littered with empty small dishes, and a smattering of olive oil drops. With satisfied bellies, the jug now empty, our conversation remained lively.

Sparks were flying and… (well, perhaps that’s a story for another day.)

Until then, how about an easy Tortilla de Patatas.

Tortilla de Patatas

(a very simplified version)

In a frying pan add

a good couple of slugs of olive oil

some cubed cooked potatoes (4-ish)

beaten eggs (4-ish again)

cook on a medium heat until it starts to cook on the edges. Then pop a lid on, lower the heat to cook for a further few minutes until cooked through. Season to taste.

*******

eat with gusto, a glass of sangria and your very best Spanish pick up line

“Donde estas la zapateria?” (which is probably not your best pick up line.)

Ricotta Corn Cakes- Frugal Friday

Corn fritters were an easy staple in our household growing up. Mix them up and fry them. Simple, frugal and pretty versatile with what you ate them with. As a kid, I liked to eat them with a good dousing of tomato sauce on top. 

Corn fritters was also the first thing I taught Monkey Boy to make. It was a couple of years ago now, and Little Monkey was really sick. I was holding him, but needed to get something on the table for dinner. I asked Monkey Boy to help and between us we did it. With one free hand from me and two of his more than willing hands, we mixed and dolloped. Because of that first proper kitchen lesson several years ago, it’s still his favourite thing to help me make.

This recipe is a simple variation of the humble fritter. A lot lighter with the ricotta, and baked rather than fried. Although you could just as easily fry them if you wanted.

Simple, cheap and healthy.

Team it up with a rocking salad and some homemade chutney. Or eat cold for lunch, (dousing in tomato sauce as an optional extra.)

Ricotta Corn Cakes

1 can corn (420g)

2 beaten eggs

300g ricotta

a couple of shallots finely sliced

1 tsp cumin

1 tsp coriander

75g s/r flour (1/2 cup)

salt to taste

Mix all together and pop in greased mini loaf pans. (Or muffin tray, patty pans, or simply fry them in a frying pan.)

Bake at 200C for approximately 30 minutes.

*******

For everyone that took the time to comment on my post before, a huge, huge thank you. You all make this whole blogging thing such a wonderful space to be in. I felt really touched by all of your words… and I think you’re all just a bit awesome! 

surprisingly good chocolate hazelnut brownie


I think hazelnut chocolate is my second favourite chocolate, I boldly declared to Mr Chocolate.

It’s not quite as good as marzipan, but it’s definitely up there… trailing off just a little as I mused on the merits of both of them.

Yep… hazelnut and chocolate, they go really well together.

After voicing my new-found decision of having a second favourite chocolate, I decided I needed to revisit the taste as quickly as possible. Just in case my bold statement had been made in haste. Chocolate…check. Hazelnuts…check. Fifteen minute window period to put it all together?…check. Melt, stir, pour, bake.

It seemed too easy.

Usually my baking needs a few tweaks, a change here and there, and trialled a few times to get it right. So I was surprised after tasting a corner of this one to find it worked just the way it was. I tried another corner just to make sure. No, seemed fine there too. A third corner? Yep, pretty similar to the other two corners.

It really was a surprisingly good hazelnut brownie.

Chocolate Hazelnut Brownie

200g chocolate (50%)

250g butter

200g brown sugar

4 beaten eggs

2 tsp vanilla

150g hazelnuts (I blitzed whole ones)

50g self raising flour

In a pot add the chocolate, butter, sugar and vanilla. Gently melt it down and add remaining ingredients. Pop into a greased and lined tray.

Bake at 180C for approximately 35minutes, and then let it cool in the tin.

old fashioned brownie


My grandmother recently gave me her mother’s recipe for brownie. Now this is brownie not as most of the world today knows brownie, (a chocolatey, decadent dense slab.) This is brownie that was born out of two world wars and one great depression. A time when making do and frugality skipped hand in hand and landed with a plop on your kitchen table top.

During this period, sugar was readily available, locally grown sultanas were in abundance and a simple slab of this would easily fill up hungry bellies. My grandmother in the 1960’s did the same thing with her children, reducing the sugar somewhat (it’s achingly sweet) and filling my dad’s childhood bottomless belly along with that of his siblings. I remember eating great squares of it when I would go and visit. The ting of the metallic cake tin as eager hands would cut just a little more.

Twenty plus years went by and speaking with Grandma she reminded me of it again. Asking whether I would like the recipe for the bottomless bellies of my own Monkeys. I sure did, but…. couldn’t promise I would adhere strictly to the recipe. (I have a proud “Hack Baker” reputation to uphold here!)

(original recipe without the mixed spice)

First go, and I did follow it to the letter, (well almost, I didn’t have any mixed spice, which sort of loses the ‘brown’ effect. Ooops.)

It’s tooth achingly sweet, but gets a thumbs up from Little Monkey and visiting friends tasting it. One friend said it’s exactly as her grandmother would have served up during the same era in the UK. I do like it, it’s very plain and simple, but I think I could probably fiddle with it and jazz it up just a little.

So I did.

Now I had set my self rules with this though. It still had to be frugal and simple, with minimal butter, and no egg at all. I did wonder to myself as I handed out another slab for The Monkeys to eat, what my Great Grandmother would have thought about this slightly jazzed up version of her trusty old recipe.

I like to think she’d have liked it.

Great Grandma’s Brownie

1 cup sugar

1 cup water

1 cup sultanas

1 tbls butter

1 cup plain flour

1 tsp cinnamon, nutmeg, mixed spice and baking powder

Boil water, sugar, sultanas and butter together for approximately 5-10 minutes. Allow to cool, add remaining ingredients. Bake in a greased and lined tin at 180C for approximately 30 minutes.

My Old Fashioned Brownie

1 1/2 cups currants and raisins (or mixed fruit)

2 cups water

3/4- 1 cup brown sugar

50g butter

zest of a whole orange

1 tsp cinnamon

1/2 tsp nutmeg

1/2 tsp ginger

3 cups self raising flour (450g)

Add all ingredients together (except flour) in a pot and boil for about 5 minutes. Allow to cool completely. Add flour, fold through and pour into a greased and lined square tin.

Bake at 180C for approximately 40 minutes.