I’ve got a clever friend who is an advocate for urban goats. I think she might be on to something. Yes I do.
Inner City Goats
7

I’ve got a clever friend who is an advocate for urban goats. I think she might be on to something. Yes I do.

It worked! It really worked!!
It’s not every day that you excitedly talk pickles with your landlord’s handy man. But I did, and here I was again, excitedly telling him over the phone that the very same pickles we had been scrutinising several days earlier had indeed worked, and I was just a little bit excited.
I had made sauerkraut before, and that was certainly easy enough, (although the last batch did have to tossed out due to a truly unimaginable miasma settling in my kitchen-due to it being far too hot to be fermenting sauerkraut. Bless my birkinstocks, and oh my goodness…it stank. It really did.)
So with the sauerkraut in mind, I was a little nervous embarking on the pickles. Consulting the fermentation bible though and it seemed hot weather was still ok to work with. I had some wonky farmers market cucumbers that seemed perfect for pickling. So lets give this pickle thing a crack.

Each day I would study the jar, looking for changes. On the third day I found them. It started going a little cloudy, then on the fourth there was a scum on the top. I wasn’t sure, I really wasn’t. I’d just seen the week before, a 20cm high mould growth from the top of someones pickles. Was this the beginning of a similar path??
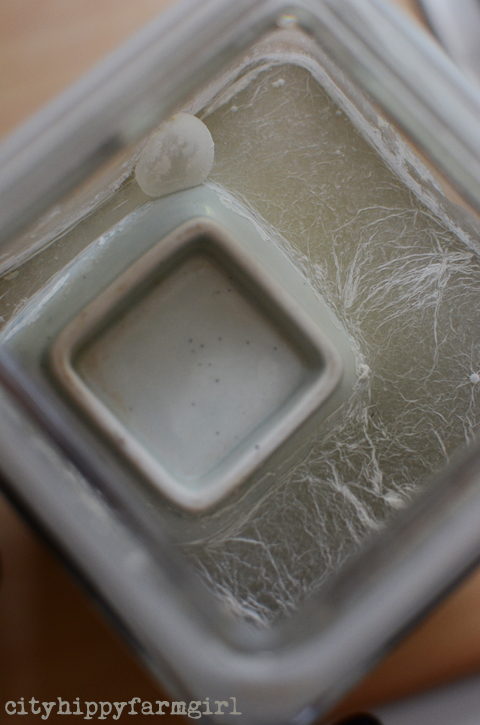
surface mould on the fermenting pickles- small ceramic dish to weigh the pickles down and keep submerged.
Then the handy man came over. After tending my minor fixing-things, talk turned to the mouldy scum pickle concoction on my bench top. They’re fine, he assured me, sunlight, skim the scum off and they are nearly ready due to the change of colour. Turns out my handy man’s mother had decades under her belt of making pickles, just like the method I was trying to replicate. Luck indeed, I had in my kitchen, years of pickle knowledge; albeit once removed, (but that was certainly good enough for me.)
Now I was curious, really curious.
Another two days went by and then I was ready. Mouldy scum scooped off (since it had appeared I had done it every 12 hours) and a pickle gently rinsed.
I sniffed, smelt like pickle.
I admired, looked like pickle.
I nibbled the end…

It tasted like pickle!
Douse me in cheese and roll me in a sandwich. Yes indeed, I had myself a pickle! Well pickles. I had a whole bunch of these glorious naturally fermented pickles and I was just a little bit excited.
Which is why several hours later, when I had to make a phone call about all things handyman related I couldn’t help but blurt out over the phone…
It worked! It really worked!

*************
Last year I tasted a three dollar jar of pickles from Germany. Aside from the massive food miles for such a simple jar of food I also got a migraine type headache within half an hour of eating one of the pickles. I did it twice more before ditching them and vowing never again, not even in a moment of pickle weakness.
Eating anything naturally fermented is filled with wonderful probiotics. If you would like to know more about the awesome world of fermentation I highly reccommend this book and if you are super duper quick (and in Australia) you get to hear and learn from the man himself.

That moment when the Tiramisu sits on the kitchen bench, finished and ready to eat. A satisfied moment when you think, yeah…that looks alright.


That moment when you are gifted some homemade pickled garlic. Thankful for generous friends and impressed that she had got a farmer to grow ten kilos of organic garlic just for her.
That moment when you know the starter is ripe and ready. It’s time to get doughy.
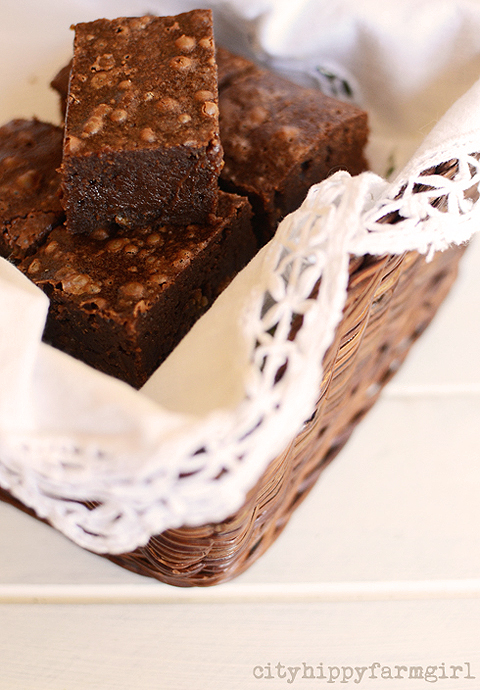 That moment when you bite into a new concoction chocolate brownie, nod and smile a little. A chocolate brownie that was deadly simple to make and not disappointing at all to the taste buds, (with a few added surprises in there as well.)

That moment when you see at your friend’s house a pretty nifty kitchen addition that you know you have to give a look into. Enter the ‘Apiwrap’– “…eco friendly and reusable kitchen wrap, perfect for storing food in the fridge or to go.” So what does this mean? It means a pretty rocking alternative to glad wrap people.
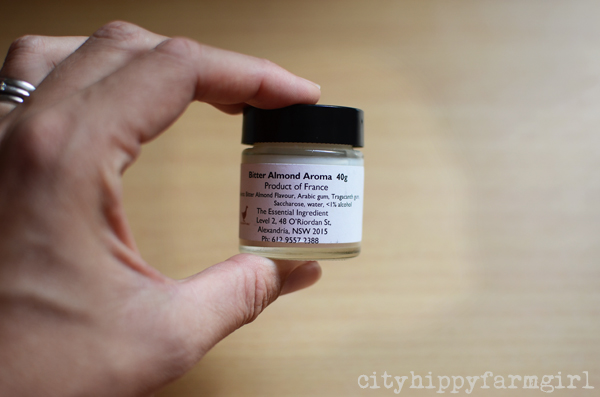
And that moment of quiet inhalation of a tiny gifted pot of almondy goodness that no one else wants to know about. That is almond heaven right there, (all marzipan dislikers need not inhale.) Now what to make with you my pretty?
What’s happening in your kitchen at the moment?
*************
linking in with the lovely Celia for in my kitchen

When I gave birth last year here at home, there were already long held plans of what I was going to do with my placenta. I wanted to plant it, to honour it and give it the respect it deserved by planting a tree over it. My only slight problem, was that I didn’t have access to dirt, real in the ground dirt.
My images of planting a tree, that would one day be metres and metres tall, providing shade and perhaps some sort of food that my grown up children could eat from, would have to be slightly deviated from. (We live in a rented apartment, with a small shared courtyard.) There were no substitute backyards to choose from for us and I wasn’t convinced some guerilla gardening placenta style in our local park would work with long term results.
So with that in mind, we kept it frozen in an ice cream container until the right day came along.
Finally the time felt right. A large pot was bought and filled, ready to take in the precious cargo. I still hadn’t quite decided on what plant was going to go in, but I was ready to make the first step in honouring our placenta. After some whispered personal words, and a few fascinated pokes, prods and careful watching from the little people. I covered it with soil. Loosely covering the top of the pot with another pot, so no neighbouring dogs would try to investigate. I could then let the placenta gently break down before having something planted over it.
One month went by, and it had completely broken down. Every little part of it. You would never have known what was once there. Magic.

Now I just had to decide what to go over the top?
I narrowed it down to a citrus or an olive tree. Something that could handle being in a pot and wouldn’t mind the somewhat brief sunlight that my little courtyard could offer it. I talked with Nick from Milkwood to see what he suggested and a cumquat came up. I felt a bit mean initially, as I was the only who actually liked them. But I did like them, actually I loved them, and maybe one day this little girl would love them too. What sold me completely was standing before the ‘Australian Cumquat’ in the nursery and seeing the sign say, “hardy” and “well suited to pots”. I think this was our plant.

I have had a few strange looks from people when I’ve mention what we did. However, now the idea of just tossing the placenta in a bin or incinerator sounds far more ridiculous and less than respectful to me. Our ‘Australian Cumquat’ has been planted, and along with it some companion plants along side it, (trying to think along permaculture lines.)


Chocolate Mint, chives, and alyssums for keeping moisture in, (instead of using mulch and being useful at the same time.) Plants chosen for being edible or encouraging of bees, hopefully not going to compete for too much root space and fragrant enough to deter pests. Two pots either side of this now also have regular mint and lemon balm. On the other side rosemary- which also flowers, encouraging bees and has a pest deterring fragrance. Above the cumquat on the fence line, more sweet scented alyssum.
I’m hoping I’ve got it right and these plants will all be happy where they are. At the very least, I’ve now got a tiny once concrete corner that is already bringing joy. Just knowing that in our tiny backyard space, our plants are doing what that precious placenta first set out to do, bringing life.
A tree of life.

*************
If you are thinking about planting your own tree of life, some sites that might be helpful.
Tips for planting a placenta fruit tree.
How about you? Are there any particular cultural customs that you observe? Have you planted a placenta?

Looking at the shelves, I see a sea of whites, and pastels before me. Now how did that happen? How have I gone through two newborn stages before and still have a cupboard so lacking in colour? It looks like colour was a bit slim on the ground before 3-6 months. Hmmm, need to change that.
How about some playing with natural dyes and see what I can come up with? With yellow on my mind lately, I remembered this post from this lovely lady. It seemed turmeric was looking like a good choice and having come home with some fresh turmeric from my favourite market stall a few days before, an even more logical choice.
Some fresh turmeric dyeing action it was going to be.

First up, some turmeric sliced into pieces and put into enough water to just cover the items I want coloured.

looking lemony yellowy looking after 24 hours of soaking… now to cook it.

After an hour of gently boiling. The colour looks good, but will it stay? (Turmeric seems to be one of the few natural dyes that don’t need a mordant.)

After one wash in the machine and line dried… looking rather lemony again, not the brighter yellow I was after. The wash wasn’t what did it, it seems the sun fades it, and rather quickly.
Try again…
This time with one teaspoon dried turmeric and enough water to just colour the material, cold water soak for an hour. Rinsed until the water runs clear, and how’s it looking? Looking like a wonderful bright yellow.

On the line to dry again, and once more it seems to fade a bit with the sun. This time I’m ok with that though. The colour is more vivid, and if it fades well so be it, it’s a natural dye. A natural dye that has its own rhythm and opinion it seems and if I really want to vamp the colour up again, well I just need a teaspoon of turmeric and little cold water.
Have you had great natural dyeing action? What are your favourite colours or items to use?


Hippy bread. That’s what my mum would probably say if I told her what the loaf of bread sitting beside me was called.
Maybe it should be called superfood bread? Both chia and quinoa seem to be happily sitting under the superfood umbrella at the moment. Basking their superfood bodies in the healthy food spotlight. Rightly so, as this loaf certainly feels good and healthy on eating. I’d picked up some locally grown quinoa in Tasmania and already had some chia lounging in the back of the fridge. I was ready to jump back into the sourdough making after being away and these two super heroes had their names written down for my upcoming loaf.
After we had got back from Tasmania, checking the sourdough starter in the fridge was one of the first things I did. Actually I checked both of them, as I had put two in different bowls in different positions to try to make sure something was still happy when we got back.
Why so pedantic?
It all started a few weeks back. There I was on an everyday Monday, with a head full of things that left very little room for much else. I needed to make bread and while in my whole heartedly distracted state, I used all my starter. Yes. Allll my starter. My starter that I had been gently nurturing for over a year, providing my family with abundance of loaves of bread, and I had just used it all.
A sharp intake of breath, a slight sweating of the brow, and a quickened heart beat. Oh, oh, oh….
It’s ok! I’ve got a frozen bit for back up. I had recently used another frozen portion to see how the whole bringing it back process actually worked. I’d also written a draft post on it. It was going to be fine. It was going to be fine…
But it wasn’t. It wasn’t fine. I gave that little frozen starter so much love it clearly didn’t know what to do with itself. An encouraging one teeny tiny bubble a day kept my hope alive. Come on little thing, you can do it, I softly whispered.
It turned grey. I changed bowls. I added more water. I added more flour. I added honey. I added rye… It smelt funny.
I suspected death was around the corner and in a last attempt before quietly putting her in the bin, I turned it to three different bowls with three different ways of encouraging the starter to grow to her old bubbly self. One bowl died immediately, and two decided to give themselves one more go. Two bubbles…three bubbles, four bubbles. Frog spawn! Oh the joy! Thank you, thank you, thank you.
Yes, I could have got some starter back from friends who have now embraced the sourdough pilgrimage. I could have made another, and I could have just let it rest awhile and played with commercial yeasted bread. I could have, but I didn’t want to. I wasn’t the only one who had despaired at the thought of no sourdough. Mr Chocolate had looked on with horror when I had explained what had happened on that first distracted day. Horror again at the thought of his lunch going to have to come from shop bread…
So that’s what happened. But now, the old girls back. She was clearly itching to get cracking with some loaves of bread this time around, as it didn’t take long for those reassuring bubbles to come back at all, (thank goodness.)

2 tbls chia
150g quinoa
300mls water
—————
300g starter
450g strong bakers flour
375mls water
300g cooked quinoa and chia (I had a bit left over)
1 1/2 tsp salt
In a pot add the quinoa, chia and water. Cook for about 10 minutes or so. When the water is all absorbed and grains have softened, cool a little. Add starter, flour and water. Mix together and then I left it for about half an hour. Add the cooled quinoa and chia, mix well (I used a dough hook) then add the salt. A 30 second knead/fold on lightly floured surface and back in the bowl for an hour or so. Another 30 second knead/fold and then back in bowl, covered and into the fridge for a cold sleep for about 12-ish hours. Back out, getting a tight knead together, than into the banetton for about 4 hours.
Out on to tray, slash, steam, and bake at 240 for about 40 minutes.
*This post submitted to the lovely yeastspotting


This one was inspired by the lovely Joanna at Zeb Bakes, who recently made a Roast Hazelnut and Fig Bread. It all sounded a whole lot of lovely, so I wanted to play with the flavours. I didn’t have hazelnuts… or cicely… or whole figs. But hey, I’d give it a crack.
I’d pilfered some Maggie Beer Burnt Fig Jam from my mothers pantry awhile back, and had happily been slapping it on to my sourdough in the mornings. However this was all the figgy-ness I had in the kitchen so the last bit would have to go in, (I was thinking some figgy streaks through out the bread). I only wish I’d made this bread at the start of the jar, as now, I might have to get some more, (at a real shop, not just my mother’s pantry).
The rosemary addition held its own and seemed wonderfully paired up with the fig jam. It wasn’t overwhelming in flavour, but did smell great when I sliced in to it. The almonds, I could have done better. I should have pushed them into the dough before the overnight prove, as in the fridge the dough developed a slight skin and I wasn’t sure just pushing them into the dough just before baking would be enough to keep them in. I think the bread needed some proving time around the whole almonds. Hugging them tight. Once toasted though they added a lovely subtle crunch to the rest of the bread.
I wasn’t the only one inspired by this bread. Heidi from Steps on the Journey also did her version of the same loaf. So it seems like a good one to play with… and play again, yes… I think I will.
200g starter
375g strong bakers flour
1/2 tsp dark malt flour
200mls water (approx)
1 tbls fig jam
1 tsp finely chopped rosemary
1 tsp salt
whole almonds
Mixed starter, flour, dark malt flour and water. Rest period (40 mins). Added remaining ingredients, mix, (I put the jam in last as I didn’t want it to be thoroughly mixed through, more of those figgy streaks). Leave for an hour or so. Quick knead on a lightly floured surface, and shaped into a boule and popped on a tray- decorate with almonds, covered with a plastic bag and left for about another hour and into the fridge for 12 hours. Brought back to room temperature, slash, and then baked at 240C with steam.
* submitted to the wonderful yeastspotting

soap nuts

little cotton bag you put them in
So what are they?
“Soapnuts ( Sapindus mukorossi ) are an environmentally friendly, sustainably produced, bio-degradable and compostable alternative to commercial laundry detergents. Grown wild in India, for centuries these nuts have been used for many purposes, from laundry to cleaning jewellery and treating contaminated soil. They are most widely recognised as being an effective and environmentally friendly natural detergent, but can be used for a wide variety of other uses.” New Internationalist
Do they work?
Yep, they do. The clean just as well as any other laundry liquid I was using. There is no lingering soapy smell. There is a tiny and pleasant clean, fresh smell when I first get the washing out of the machine. You have to really stick your nose in the fibres to get it though and nothing residual once the clothing as dried. They also leave everything quite soft. No need for any fabric softners, (if you use it.) There is a really great indepth post here comparing the nuts with regular washing powder. The Monkeys don’t play neatly, and it manages to get all the grime off their clothes.
How expensive are they?
Not all. You only need to use 6-8 of the nut shells in a load and then they are then re-used for another 4-6 times. All you need to do is dry them out in between washes and peg the little bag up when you dry your laundry. So the 500gm bag lasts for ages. New Internationalist (where I got mine) claims they will last for about 6 months doing about 200 loads. That seems to be fitting in with how I’m using them too.
What do you need to do?
Put 6-8 shells in the little bag (3 are included) pop it into some hot water for a minute (I stick a bowl of water in the microwave) and then put the bag and water in with the load of laundry.
Is it too much of an extra effort to do it all the time?
Nope, not all. A minute to warm the water, and a few seconds to empty the bag to dry it and the shells. Super easy.
Can you use them for anything else?
I’ve only used them for laundry, but you can apparently use them instead of regular shampoo, hand wash, cleaning jewellery and pest control in the garden.
What to do with them when you are finished?
They can go in the compost or used as mulch in the garden.
Any problems?
No problems for me. I’ve been really happy with them, and will keep using them.
Some places to find them
new internationalist Australia
Wildsoapnuts.com Australia
